BLOG
Category: 'release'
Manage Cloud Foundry from OSX with Thor
We're excited to announce that a stable release of the OSS Thor client is ready to go! Thor is a OSX client tool for managing ANY Cloud Foundry v1 environment. You can view (and contribute!) to the source code, or download a ready-to-use, compiled version.
Read MoreDeploy .NET Apps to Cloud Foundry v2 with Iron Foundry
The Pivotal team recently made a significant upgrade to Cloud Foundry, changing how applications are deployed, staged, isolated, and routed. In order to work with this new model, Iron Foundry had to undergo some re-engineering work. Today, we’re proud to announce an initial release of a Cloud Foundry v2-compliant build of Iron Foundry.
Read MoreNew NG Repos
Many of you have asked us what our plans are on Cloud Foundry NG and we want to let you know that we are hard working on it full time now with plans to see this ready soon.
Read MoreLatest Alpha Release Features & Additions for the Thor Cloud Foundry UI
Hello Thor Users. We're still in alpha with Thor, but I wanted to share some of the latest progress that has been made over the last few weeks. Here's a run down point by point of the latest pull request #109:
- Button, styles, and related materials are in line with OS-X standards for the workflow screen of deploying an application.
- Deployments for node.js, erlang, java, .NET and the other supported applications now works.
- More unit tests added around new key features, especially detection of the language/framework support.
- Easier to navigate workflow wizard for deployment with appropriate drop out points, etc.
- Thor User wants to be able to add a service to the available services.
- Thor User wants to view a list of services available for use.
- Thor user wants to be able to view multiple bound services for an application.
- Thor User wants to be able to bind a service to an application.
- Thor user wants to see various X parameters for their running services.
- Thor user wants to be able to view available services for their application(s).
Weekend Iron Foundry Work (Downtime Window)
This weekend we'll be doing some upgrades to the instances & software that the current Iron Foundry sand box runs in (api.ironfoundry.me). The time frame of the down time will be between 8pm and 10pm on Sunday night. We'll update this blog post with any additional news that might affect the applications currently running or being tested in the Iron Foundry sand box environment.
Read MoreManaging PostgreSQL and MySQL Application Instances in Iron Foundry
One reasonable concern with PaaS platforms is whether or not developers can easily access and administer backend application services. Iron Foundry database services such as PostgreSQL and MySQL have very strong management tools that you don't want to abandon when working with a PaaS instance. In this post, we'll look at how to wire up existing database management tools to PostgreSQL and MySQL.
PostgreSQL
PostgreSQL (discussed in this previous Iron Foundry blog post), is a very popular open source database. Developers or database administrators typically use the pgAdmin tool to author and debug queries, perform database backups/restorations, reindex and cleanup (VACUUM) data, manage server jobs, and much more. You can download the pgAdmin tool directly, or find it included in the PostgreSQL package itself. For this demonstration, I installed PostgreSQL locally and got the pgAdmin tool along with it. After installing the database software, I opened a command prompt on my Windows machine and targeted my Iron Foundry environment. After authenticating myself, I issued a vmc command ("vmc services") to see which application services were available, and which services I had already provisioned.
  So far, no application services were provisioned. Let's change that. I created a new PostgreSQL instance by issuing the vmc command vmc create-service postgresql. Note that I didn't need to bind it to an application and can simply create a standalone instance that could be used by many Iron Foundry web applications.
  Now there was a running instance of PostgreSQL in my environment. At this stage, there was no way for the pgAdmin tool to access this instance. However, thanks to the Cloud Foundry Caldecott technology, I could create a secure tunnel for pgAdmin. The vmc tunnel
  I could have chosen to use the psql client which would have let me issue commands right here in the command prompt, but since I wanted to use the full-featured pgAdmin tool, I selected the "none" client. Notice that I got four key pieces of information back: username, password, name and port. Together, these data points will get us logged into our environment. I opened the pgAdmin tool and could see that the only server currently recognized was the one on my local machine.
  I clicked the "Add a connection to a server" and was shown the "New Server Registration" prompt. For the "Name" value, I used the "name" that came back from the tunnel command; for "Host" value I set it to "localhost"; for the "Port" I used "10000"; and for the Username and Password, I used the corresponding values returned by the tunnel command.
  Once connected, I could navigate all the database artifacts and browse the standard options for backing up data, querying tables, and creating new tables.
  The pgAdmin tool is a very handy and useful way to manage your database artifacts and Iron Foundry makes it easy to use this tool against your application services.
MySQL
MySQL is also a very popular open source database and we want to make sure that database developers and administrators can use familiar tooling even if their application instance sits in a PaaS like Iron Foundry. The MySQL team has made significant investments in their Workbench tool, and here we'll see exactly how you hook the Workbench up to an Iron Foundry instance. First, I downloaded the standalone Workbench tool. Then, I added a new MySQL instance to my Iron Foundry environment by using the vmc create-service mysql command. Like the PostgreSQL example prior, I created a tunnel so that the MySQL Workbench tool could "see" our Iron Foundry instance. As before, I also chose the "none" client so that I could connect the GUI tool instead of issuing command statements only.
  Notice that I got back database credentials ("username"/"password"), a schema instance name ("name"), and a port number. I was now ready to connect the MySQL Workbench to my database instance. The Workbench has three core functions: SQL development, data modeling, and server administration.
  In this example, I created a new pair of tables, and deployed them to the database instance in Iron Foundry. In the Workbench, I clicked the "Create New EER Model" in order to generate a data model. The first thing that I did was right-click the schema name and choose "Edit Schema." On the subsequent window, I changed the default "mydb" name to the the "name" value returned by the vmc tunnel command.
  I then chose to add a new diagram to the model and proceeded to create a pair of new tables, "customer" and "order", and defined a relationship between them.
  With the model complete, I chose the "Forward Engineer" option so that this model could be used to generate the actual tables.
  I was then prompted to create an actual connection to the target database, and this is where the tunnel-provided values came into play. I plugged in the username and password, and set the Hostname value to "localhost" and the Default Schema to the tunnel-provided "name" value.
  I then kept the remaining default options, including the selection of the two tables to forward engineer, and reviewed the pending SQL Script to be executed. After successfully completing the wizard, I could open an instance of the SQL Editor and browse my schema.
  Sure enough my two tables, relationship included, were there.
Summary
While one of the key benefits of a PaaS is managed services, it's important to have the option to administer these application services using the powerful, familiar management tools currently available to users. Both PostgreSQL and MySQL have solid management interfaces and we saw here how you can tunnel into these Iron Foundry database instances and perform standard operations against your service. Read MoreAlpha For Thor - Download, Try, Get Involved
Today we're releasing the alpha Thor Applications with installers for Mac OS-X and a partial Windows 7 release. We wanted to get minimally viable products out the door as soon as possible so people could check out our progress and work we've accomplished for the Thor User Interfaces with Cloud Foundry and Iron Foundry Environments! So here they are. Here's a few screen shots to how we're doing... [caption id="attachment_145" align="aligncenter" width="816"] Thor Running on OS-X[/caption] [caption id="attachment_144" align="aligncenter" width="707"]
 Adding a Cloud Foundry Target[/caption] To download the Thor OS-X and Windows 7 installer releases check out the downloads page. We'll be iterating on the code base regularly still, so if you know github well I'd suggest going to clone the code itself and running it. The installers are still however a working option to check it out.
Getting Involved
What's Being Worked On? The workflow we're using for Thor & Thor .NET is viewable via the issues section on Github and also for a good kanban visualization we're using Huboard. For each of the projects we've started or are starting a Hubaord Kanban.- Thor on Github (OS-X Version) and the respective issues, stories and more.
- Thor .NET on Github (Win 7 Version) and the respective issues, stories and more.
- Iron Foundry (Core Iron Foundry .NET Support & Libraries for extending Cloud Foundry)
- Navigate to the main source and fork the code.
- Once you've forked the code, navigate to your repository and clone to your local development machine.
git clone :YourGithubAccount/Thor.git
- Once the clone is complete, for the OS-X version you'll need to pull the submodules with the following command. For the Windows 7 version just do a clone and build.
git submodule update --init --recursive Your local repository should have executable code now. Open the project with XCode or Visual Studio 2010, depending on which project you're checking out and see if everything works. If it doesn't, please post a comment to our or message us via Twitter on . Working on the Code Once you've added the feature, or completed one of the stories or items in the Thor issues list or Thor .NET issues list leave a comment on the issue and submit a pull request (or just submit the pull request). We'll then merge it back in, or if there are conflicts we'll work with you to merge it back in and add the code to master.
Read More
Iron Foundry Adds Microsoft Service Bus as a New Application Service
Microsoft recently released a beta version of their Service Bus for Windows messaging technology, and the Iron Foundry team has now added this as an available service in Iron Foundry. The Service Bus for Windows is a scaled down version of the Service Bus product included in their Windows Azure cloud offering. The Service Bus for Windows, which supports brokered message through both traditional Queues and multi-subscriber Topics, provides Iron Foundry developers yet another option when building distributed applications. Our awesome dev team followed the standard steps for adding new application services to a Cloud Foundry / Iron Foundry environment and also used a previous write-up of mine to guide the software installation. We’ve already updated the vcap-services source code into Github and you can clone the mssb (Microsoft Service Bus) directory today. There were also changes to the .NET DEA to account for this new service and handing credentials back to the user. The Service Bus for Windows uses Microsoft SQL Server for its persistence tier, so we’ve tied the service to the instance of SQL Server that runs in Iron Foundry. Our hosted ironFoundry.me environment is running this today, and we’ve provisioned a shared Service Bus farm and host that holds each consumer’s individual namespace. Let’s see a demonstration of this in action! To make life easier, we’ve built a sample web application that interacts with Service Bus Queues. We’ll start by looking at that application, and then deploy the application to Iron Foundry. The application contains a few ASP.NET Web Forms and a helper class. The helper class (QueueManager.cs) contains a singleton that upon startup, parses Iron Foundry-provided URLs and credentials encoded as JSON in the application’s web.config file and uses those parameters to instantiate the core objects in the Windows Service Bus SDK.
Then we have some static operations for both sending to and receiving from the Service Bus Queue.
These operations are used in the pair of core ASP.NET pages to send and receive messages. Let’s now deploy this application to Iron Foundry and see how it works. Using vmc, I targeted the api.ironfoundry.me environment. 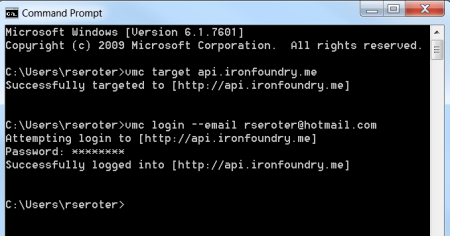 I can confirm that the Service Bus for Windows is an available service by issuing a vmc services command.
 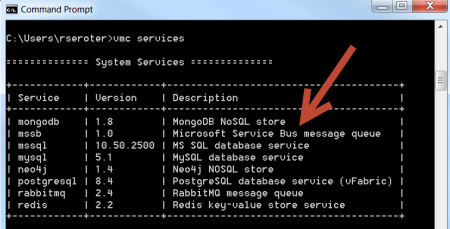 Great. Now let’s push this web application and provision an instance of this new service type. After publishing the ASP.NET web application to a file directory, I issued the vmc push command to start the deployment process.
  At this stage, I’m asked if I want to create a new service instance to bind to, or if I had already provisioned one, which instance I’d like to associate with. In this case, I have no existing services, so I’ll choose to create a new service.
 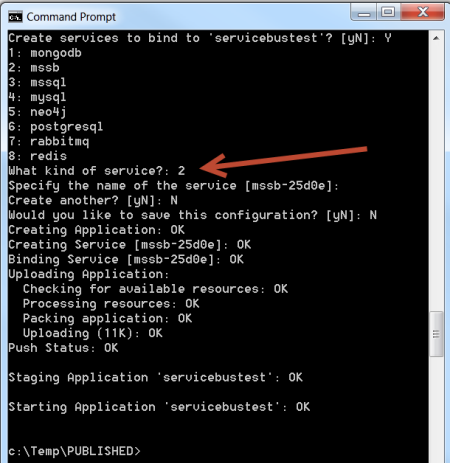 Within a matter of moments, my application is deployed and a new service instance is provisioned in the shared environment. This environment is not currently part of a Windows domain, so during service provisioning, a new local user is created and assigned to the developer’s own Service Bus namespace. All the URLs and credentials for the application are injected into the application’s web.config file. We can see this through vmc by viewing the file with the vmc files
 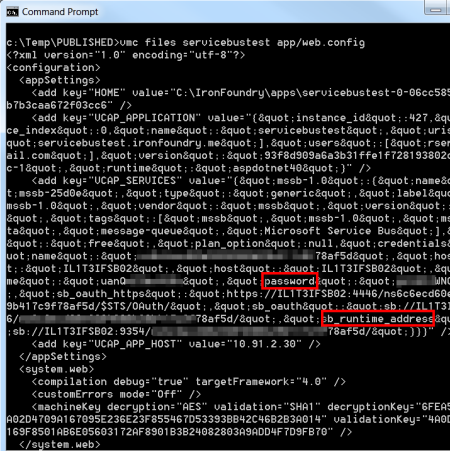 These JSON-encoded values are then read by our application and used when authenticating the caller during Queue operations. Upon visiting the URL of the Iron Foundry application, we can see the option to send a message to a Queue.
 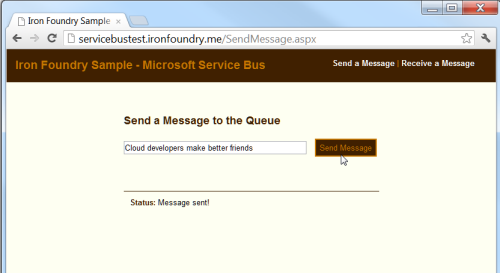 When we submit the message, it is added to a Queue, which means that it is persisted in a database. I then switch over to the “Receive” web form and choose to pull all of the messages from the Queue.
 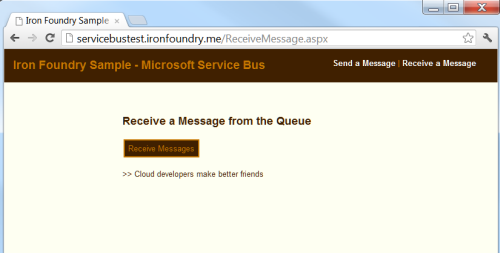 The Service Bus for Windows is still in Beta, but we thought it would be fun to add this as an Iron Foundry service. You can download the source code for this sample application from here. Messaging is a core part of many modern web applications and the Service Bus for Windows gives Iron Foundry developers another way to link systems together.
Iron Foundry Support for Stackato 1.2 Released
With the latest changes from the Cloud Foundry team (re: anniversary of Cloud Foundry) comes a new and improved Stackato & Iron Foundry Micro VM combo. We've checked and tweaked things to run even better in your Stackato + Iron Foundry environment with the latest downloads. So check out the latest available micro image downloads for Stackato. The ActiveState Stackato team provides images available in:
Some of the changes and additions include...- Introduction of group management to Stackato managed applications
- Support for separate per-user and per-group limits
- Users can be in zero or many groups
- Heroku buildpack framework support, with built-in buildpacks for Clojure, Go, Java, JRuby, Play! and Python
- Updated Stackato App Store
- Multiple App Store sources supported
- Stackato admins can control App Store sources from the console
- VMware VMX
- OVF Format
Caldecott with MS SQL Server!
Yesterday we launched our new testing environment that you can read about. With that announcement we added support for Caldecott which allows you to tunnel from your environment to services in the Cloud Foundry environment. Today we have enabled MS SQL support with Caldecott into our .ME environment and also our own version of the Cloud Foundry VMC that has all of the Iron Foundry support built in. Install VMC Iron Foundry Install Ruby for Windows from Ruby Installer. This is tested using version 1.9.3. During installation you can either add ruby to your PATH or add it manually later. Run the following commands from a command prompt. You should ensure that ruby and sqlcmd are in your PATH as well. Checking ruby version:
C:\>ruby --version
ruby 1.9.3p125 (2012-02-16) [i386-mingw32]
C:\>gem install vmc-ironfoundry --preCaldecott and MS SQL To use Caldecott on Iron Foundry from a Windows machine to connect to a provisioned MS SQL database, follow these steps. Install Ruby for Windows from Ruby Installer. This is tested using version 1.9.3. During installation you can either add ruby to your PATH or add it manually later. Run the following commands from a command prompt. You should ensure that ruby and sqlcmd are in your PATH as well. Checking ruby version:
C:\>ruby --version
ruby 1.9.3p125 (2012-02-16) [i386-mingw32]
Ensuring that sqlcmd.exe is in your PATH. If not, it is located by default at C:\Program Files\Microsoft SQL Server\100\Tools\Binn\sqlcmd.exe
C:\>sqlcmd /?
Microsoft (R) SQL Server Command Line Tool
Version 10.50.2500.0 NT x64
Copyright (c) Microsoft Corporation. All rights reserved.
Install the vmc-IronFoundry gem
C:\>gem install vmc-IronFoundry --pre
Fetching: vmc-IronFoundry-0.3.16.IF.1.gem (100%)
Successfully installed vmc-IronFoundry-0.3.16.IF.1
1 gem installed
Installing ri documentation for vmc-IronFoundry-0.3.16.IF.1...
Installing RDoc documentation for vmc-IronFoundry-0.3.16.IF.1...
Target api.ironfoundry.me and log in to your account
C:\>vmc target api.ironfoundry.me
Successfully targeted to [http://api.ironfoundry.me]
C:\>vmc login --email  --passwd XXXYYYZZZ
Attempting login to [http://api.ironfoundry.me]
Successfully logged into [http://api.ironfoundry.me]
Provision an MS SQL database
C:\>vmc create-service mssql
Creating Service [mssql-c902d]: OK
Tunnel to your database
C:\>vmc tunnel mssql-c902d sqlcmd
Deploying tunnel application 'caldecott'.
Uploading Application:
 Checking for available resources: OK
 Packing application: OK
 Uploading (1K): OK
Push Status: OK
Binding Service [mssql-c902d]: OK
Staging Application 'caldecott': OK
Starting Application 'caldecott': OK
Getting tunnel connection info: OK
Service connection info:
 username : uxeBbNM0jYAFS
 password : psOmxGWibimeX
 name : d7dedaf7e01ae42568c07c44ec30bff99
Starting tunnel to mssql-c902d on port 10000.
Launching 'sqlcmd -S localhost,10000 -U uxeBbNM0jYAFS -P psOmxGWibimeX -d d7dedaf7e01ae42568c07c44ec30bff99'
1>
You can now run commands from within sqlcmd against your database!
1> select @@VERSION 2> GO Microsoft SQL Server 2008 R2 (SP1) - 10.50.2500.0 (X64) Jun 17 2011 00:54:03 Copyright (c) Microsoft Corporation Enterprise Edition (64-bit) on Windows NT 6.1In addition, you can use the displayed connection information to connect via SQL Management Studio. Just use localhost,10000 as the "Server name". Be sure to start the tunnel first and keep it open during the time you're using Management Studio. Quitting sqlcmd will close the tunnel.(Build 7601: Service Pack 1) (Hypervisor)
 Read More