BLOG
Category: 'how to guide'
Building Iron Foundry Apps that Leverage Windows Azure ACS for User Authentication
Iron Foundry and other PaaS frameworks are built to deliver a set of services to developers for building applications. While we think Iron Foundry has a great set of web, data and messaging services available, it by no means includes everything that a developer can use to craft a cool web app. Ideally, a developer can mix and match services from multiple PaaS providers in order to get everything that’s needed to solve a particular problem. For instance, what if an Iron Foundry developer wants to build a .NET application that lets users log in with credentials from a trusted provider? In this blog post, I’ll show you how to do user authentication/authorization in an Iron Foundry ASP.NET app by using the Windows Azure Access Control Service (ACS).
What is Windows Azure ACS?
Windows Azure ACS is essential a claims transformation engine that connects to trusted web identity providers (e.g. Facebook, Google, Windows Live, Yahoo) and custom identity providers (e.g. through Active Directory Federation Services), and authenticates the user before passing along a set of claims to your web application. It provides developers a way to outsource the identity management part of their application. ACS itself doesn’t store credentials or act as an identity provider, but rather, it acts as a middleman that can take a series of input claims (e.g. “Google username”, “Windows logon ID”) and transform them into a single claim (“user ID”) used by your app. It’s a cool way to get your application out of the business of handling unique identity providers or storing credentials.
Let’s walk through the steps to building a simple, secure web app that we can deploy to Iron Foundry.
Step 1 - Create new ASP.NET MVC 4 (internet) application
To get started, I built a new ASP.NET MVC application in Visual Studio 2012.

Once the project was created from the MVC4 template, I simply built it and ran it. You can see the default website and notice that I can register for an account. At this point, what this does is store my credentials in the default membership provider (which is a local database). I don’t want that as my long term solution. I want to let users log in with their web identity provider of choice.

2. Configure Access Control Service to Recognize Our Iron Foundry Application
Virtually every Windows Azure service has migrated from the clunky Silverlight portal to the new, clean HTML portal. Unfortunately, Windows Azure ACS still lives in the old portal. Once I regretfully logged into it, I saw the options to add/configure identity providers, set up the relying party applications (like the one I created), and define the claims transformation rules.

If I wanted to add ADFS as a valid identity provider, I could do that here. Instead, since I used existing web identity providers, I could jump right to the “relying party applications” section. On the first part of this form, I set the friendly name of the application, and the URL that will receive the claims. Initially (until I deployed to Iron Foundry) this was a local address on my machine.

Further down this form, I was asked which (configured) identity providers I wished to use, whether or not to create a new set of claims transformation rules, and what certificate to use for signing the tokens.

After saving my relying party entry, I jumped to the “Rule Groups” section of this portal to configure the transformation rules. I chose the option to “generate rules” for all the available identity providers, and was left with a series of “passthrough” rules that take whatever claim value was issued by the identity provider and ships it, as is, to my application.

An individual one of these rules, such as the “Google name” one, has an input claim type and value, and an output claim type and value. While the one below has the same type and passthrough value, you can imagine how you might have three different providers with different input claim types/values all map to a single, internally-defined claim type and/or value.

3. Configure ASP.NET App to use ACS for Identity Management
With my ACS configuration complete (for now), I returned to Visual Studio 2012 to make it “ACS aware.” Now there is a great new tool for Visual Studio 2012 and the latest Windows Identification Foundation bits (which you can see by grabbing the Identity and Access Tools), but since Iron Foundry doesn’t yet support .NET 4.5, I wasn’t able to use the wizard tooling. The latest WIF only applies to .NET 4.5, so I jumped back to using WIF 3.5. To easily grab this version, simply add the NuGet package for Windows Identification Foundation to a project.

With all the proper assemblies in place, I then manually updated my web.config file to reflect my use of WIF and ACS. You can find my complete web.config file below. To learn more about the significance of each section, I’d recommend the blog post Windows Identity Foundation (WIF) Configuration Sections in ASP.NET Web.Config.
That’s about it. Clearly if I wanted to customize the handling of these claims (e.g. show the value of a claim besides “name” on the home page), there’s additional work I’d want to do in my code. When I ran this application, I was quickly prompted for credentials and the ACS site served up a page for me to select which identity provider to use.

When I chose the Google provider, I was redirected to the Google accounts page and asked to log in.

Once I logged into my account, I was returned to my custom web app which recognized that I was now authenticated!

To prove that this is an account that wasn’t managed by my application itself, I clicked on my name to “manage” my user. I was presented a message indicating that there’s no local password for this user, as the identity provider was NOT my local membership provider.

4. Update and Deploy the App to Iron Foundry Environment
The final task was to update the ASP.NET application and ACS configurations before deploying the application to Iron Foundry. First, I returned to the Windows Azure ACS portal to change the “realm” of the relying party entry that I created for my custom application. I planned on deploying this application to the free IronFoundry.me environment, so I entered the expected destination of the application.

After saving this change, I returned to my Visual Studio project and entered that same IronFoundry.me URL into the web.config file where the “localhost” value had been before. After publishing the website to the file system and executing a Cloud Foundry vmc push command from my Command console, my app was quickly deployed.

Did it work? I browsed my newly published app on Iron Foundry, and just as with the local site, I was prompted for which identity provider to use. After selecting Google and plugging in my credentials, I saw my logged in user on the website.

Cool! This is a fun case of being able to use the public/private Iron Foundry PaaS but still take advantage of other useful services offered by other PaaS solutions.
Read MoreIron Foundry vcap-client (AKA The .NET Cloud Foundry vcap-client)
 Ever want to write code against the Cloud Foundry API but you don't want to go to the trouble of wrapping up the API calls with library? Well, have no fear there's no need to! With dilligent work from the Iron Foundry team, a few suggestions from outside, and a few contributions from the community we've pulled this together for you. Here's a step by step of what we've accomplished in the last week to bring a solid, clean and tested library to you.
Managing PostgreSQL and MySQL Application Instances in Iron Foundry
One reasonable concern with PaaS platforms is whether or not developers can easily access and administer backend application services. Iron Foundry database services such as PostgreSQL and MySQL have very strong management tools that you don't want to abandon when working with a PaaS instance. In this post, we'll look at how to wire up existing database management tools to PostgreSQL and MySQL.
PostgreSQL
PostgreSQL (discussed in this previous Iron Foundry blog post), is a very popular open source database. Developers or database administrators typically use the pgAdmin tool to author and debug queries, perform database backups/restorations, reindex and cleanup (VACUUM) data, manage server jobs, and much more. You can download the pgAdmin tool directly, or find it included in the PostgreSQL package itself. For this demonstration, I installed PostgreSQL locally and got the pgAdmin tool along with it. After installing the database software, I opened a command prompt on my Windows machine and targeted my Iron Foundry environment. After authenticating myself, I issued a vmc command ("vmc services") to see which application services were available, and which services I had already provisioned.
  So far, no application services were provisioned. Let's change that. I created a new PostgreSQL instance by issuing the vmc command vmc create-service postgresql. Note that I didn't need to bind it to an application and can simply create a standalone instance that could be used by many Iron Foundry web applications.
  Now there was a running instance of PostgreSQL in my environment. At this stage, there was no way for the pgAdmin tool to access this instance. However, thanks to the Cloud Foundry Caldecott technology, I could create a secure tunnel for pgAdmin. The vmc tunnel
  I could have chosen to use the psql client which would have let me issue commands right here in the command prompt, but since I wanted to use the full-featured pgAdmin tool, I selected the "none" client. Notice that I got four key pieces of information back: username, password, name and port. Together, these data points will get us logged into our environment. I opened the pgAdmin tool and could see that the only server currently recognized was the one on my local machine.
  I clicked the "Add a connection to a server" and was shown the "New Server Registration" prompt. For the "Name" value, I used the "name" that came back from the tunnel command; for "Host" value I set it to "localhost"; for the "Port" I used "10000"; and for the Username and Password, I used the corresponding values returned by the tunnel command.
  Once connected, I could navigate all the database artifacts and browse the standard options for backing up data, querying tables, and creating new tables.
  The pgAdmin tool is a very handy and useful way to manage your database artifacts and Iron Foundry makes it easy to use this tool against your application services.
MySQL
MySQL is also a very popular open source database and we want to make sure that database developers and administrators can use familiar tooling even if their application instance sits in a PaaS like Iron Foundry. The MySQL team has made significant investments in their Workbench tool, and here we'll see exactly how you hook the Workbench up to an Iron Foundry instance. First, I downloaded the standalone Workbench tool. Then, I added a new MySQL instance to my Iron Foundry environment by using the vmc create-service mysql command. Like the PostgreSQL example prior, I created a tunnel so that the MySQL Workbench tool could "see" our Iron Foundry instance. As before, I also chose the "none" client so that I could connect the GUI tool instead of issuing command statements only.
  Notice that I got back database credentials ("username"/"password"), a schema instance name ("name"), and a port number. I was now ready to connect the MySQL Workbench to my database instance. The Workbench has three core functions: SQL development, data modeling, and server administration.
  In this example, I created a new pair of tables, and deployed them to the database instance in Iron Foundry. In the Workbench, I clicked the "Create New EER Model" in order to generate a data model. The first thing that I did was right-click the schema name and choose "Edit Schema." On the subsequent window, I changed the default "mydb" name to the the "name" value returned by the vmc tunnel command.
  I then chose to add a new diagram to the model and proceeded to create a pair of new tables, "customer" and "order", and defined a relationship between them.
  With the model complete, I chose the "Forward Engineer" option so that this model could be used to generate the actual tables.
  I was then prompted to create an actual connection to the target database, and this is where the tunnel-provided values came into play. I plugged in the username and password, and set the Hostname value to "localhost" and the Default Schema to the tunnel-provided "name" value.
  I then kept the remaining default options, including the selection of the two tables to forward engineer, and reviewed the pending SQL Script to be executed. After successfully completing the wizard, I could open an instance of the SQL Editor and browse my schema.
  Sure enough my two tables, relationship included, were there.
Summary
While one of the key benefits of a PaaS is managed services, it's important to have the option to administer these application services using the powerful, familiar management tools currently available to users. Both PostgreSQL and MySQL have solid management interfaces and we saw here how you can tunnel into these Iron Foundry database instances and perform standard operations against your service. Read MoreContribute to Iron Foundry, Here's How!
We've been asked a few times, "what's the quickest, easiest and fastest way to get the code, build it and contribute back to Iron Foundry?" Here's a quick start for doing just that.
Read MoreIron Foundry Adds Microsoft Service Bus as a New Application Service
Microsoft recently released a beta version of their Service Bus for Windows messaging technology, and the Iron Foundry team has now added this as an available service in Iron Foundry. The Service Bus for Windows is a scaled down version of the Service Bus product included in their Windows Azure cloud offering. The Service Bus for Windows, which supports brokered message through both traditional Queues and multi-subscriber Topics, provides Iron Foundry developers yet another option when building distributed applications. Our awesome dev team followed the standard steps for adding new application services to a Cloud Foundry / Iron Foundry environment and also used a previous write-up of mine to guide the software installation. We’ve already updated the vcap-services source code into Github and you can clone the mssb (Microsoft Service Bus) directory today. There were also changes to the .NET DEA to account for this new service and handing credentials back to the user. The Service Bus for Windows uses Microsoft SQL Server for its persistence tier, so we’ve tied the service to the instance of SQL Server that runs in Iron Foundry. Our hosted ironFoundry.me environment is running this today, and we’ve provisioned a shared Service Bus farm and host that holds each consumer’s individual namespace. Let’s see a demonstration of this in action! To make life easier, we’ve built a sample web application that interacts with Service Bus Queues. We’ll start by looking at that application, and then deploy the application to Iron Foundry. The application contains a few ASP.NET Web Forms and a helper class. The helper class (QueueManager.cs) contains a singleton that upon startup, parses Iron Foundry-provided URLs and credentials encoded as JSON in the application’s web.config file and uses those parameters to instantiate the core objects in the Windows Service Bus SDK.
Then we have some static operations for both sending to and receiving from the Service Bus Queue.
These operations are used in the pair of core ASP.NET pages to send and receive messages. Let’s now deploy this application to Iron Foundry and see how it works. Using vmc, I targeted the api.ironfoundry.me environment. 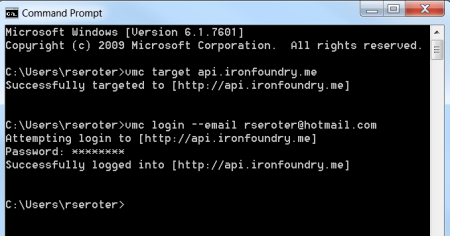 I can confirm that the Service Bus for Windows is an available service by issuing a vmc services command.
 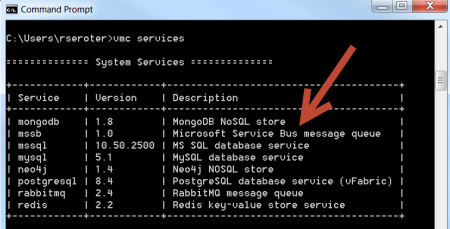 Great. Now let’s push this web application and provision an instance of this new service type. After publishing the ASP.NET web application to a file directory, I issued the vmc push command to start the deployment process.
  At this stage, I’m asked if I want to create a new service instance to bind to, or if I had already provisioned one, which instance I’d like to associate with. In this case, I have no existing services, so I’ll choose to create a new service.
 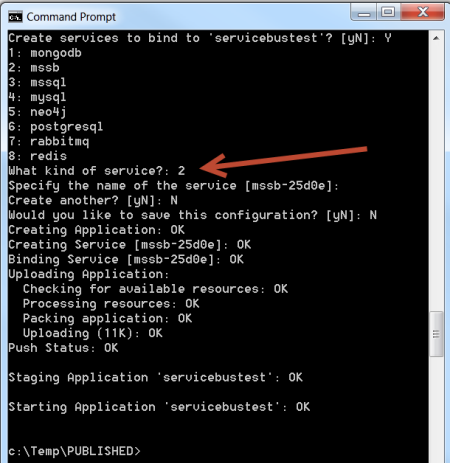 Within a matter of moments, my application is deployed and a new service instance is provisioned in the shared environment. This environment is not currently part of a Windows domain, so during service provisioning, a new local user is created and assigned to the developer’s own Service Bus namespace. All the URLs and credentials for the application are injected into the application’s web.config file. We can see this through vmc by viewing the file with the vmc files
 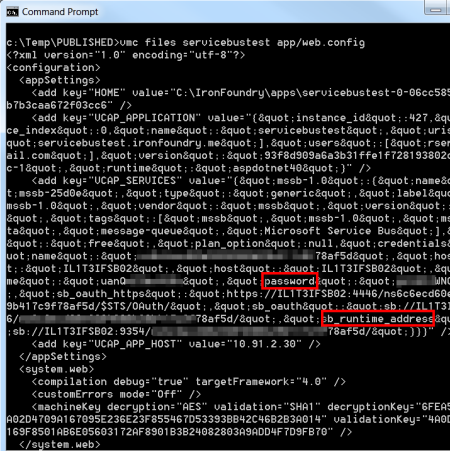 These JSON-encoded values are then read by our application and used when authenticating the caller during Queue operations. Upon visiting the URL of the Iron Foundry application, we can see the option to send a message to a Queue.
 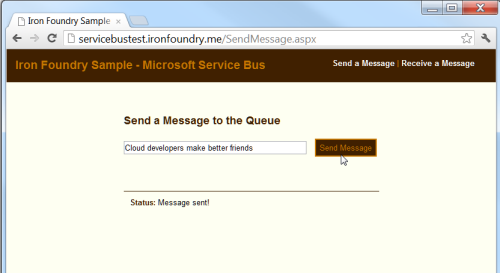 When we submit the message, it is added to a Queue, which means that it is persisted in a database. I then switch over to the “Receive” web form and choose to pull all of the messages from the Queue.
 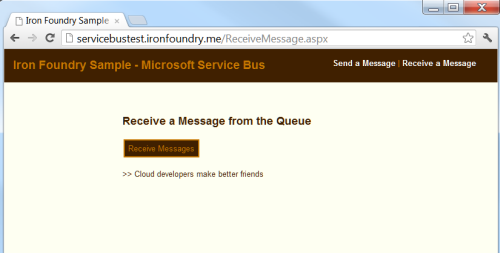 The Service Bus for Windows is still in Beta, but we thought it would be fun to add this as an Iron Foundry service. You can download the source code for this sample application from here. Messaging is a core part of many modern web applications and the Service Bus for Windows gives Iron Foundry developers another way to link systems together.
Deploying Web+Database Apps to Iron Foundry Without Changing Configuration Settings
One of the tricky things you’ll experience when working with PaaS platforms is that the local development environment won’t exactly mirror the targeted PaaS environment. While some cloud providers do a good job of having a local simulated fabric that closely mimics the cloud environment, it’s inevitable that SOME differences will exist. In this post, I want to specifically focus on database connection strings. A connection string with “server=localhost” may be perfectly fine when running on a developer’s machine, but this won’t fly when we deploy an application elsewhere. In this example, I’ll show you how we can easily keep a local database connection string while leveraging the built-in connection string rewrite that’s baked into Iron Foundry. I’ve got a ridiculously simple ASP.NET web form, and within it, a GridView that used a SqlDataSource to grab records from a database on my machine. [caption id="attachment_77" align="aligncenter" width="450"] Configuration File Markup[/caption] This application’s web.config file had a connection string (named “Default”) that included the details necessary to talk to the database. [caption id="attachment_78" align="aligncenter" width="450"]
 Default Connection String[/caption] With this robust website ready to go, I first published the site to the file system, and then spun up the Cloud Foundry Explorer tool. [caption id="attachment_79" align="aligncenter" width="450"]
 Cloud Foundry Explorer[/caption] I then chose which Iron Foundry environment to target with my “push.” In this case, I chose a Web Fabric instance hosted by Tier 3. During the push, I was asked to select the name of the application, code source location, resource needs, and which application services to bind to. I chose a Microsoft SQL Server application service. [caption id="attachment_80" align="aligncenter" width="450"]
 Push Application[/caption] In a few seconds, the application was deployed, and I could see it was up and running. All that remained was to get my local database provisioned into the cloud. Recall that Microsoft SQL Server is just one of many services available in Iron Foundry. [caption id="attachment_81" align="aligncenter" width="450"]
 Checking Services via the Iron Foundry VMC[/caption] While I’ve previously demonstrated some funky ways to instantiate the underlying database in an Iron Foundry environment, we’ve since made it MUCH easier to tunnel into these databases. We now use the Cloud Foundry Caldecott process to connect to the Iron Foundry / Web Fabric SQL Server database service. With a simple command (“vmc tunnel SeroterSqlDb”) I connected my machine to the hosted environment and when the tunnel was set up, vmc returned my database credentials. [caption id="attachment_82" align="aligncenter" width="450"]
 Tunneling[/caption] I could now fire up SQL Management Studio and log into the database with these credentials. [caption id="attachment_83" align="aligncenter" width="450"]
 SQL Server Management Studio (2008 R2)[/caption] After generating a T-SQL script out of the local database, I ran that script against the cloud database and produced the necessary tables. [caption id="attachment_84" align="aligncenter" width="277"]
 Databases[/caption] You may recall that the application’s original connection string targeted my local database. How did I update it with these new cloud database settings? The answer is: I didn’t have to! When we push a web application to Iron Foundry, and it is associated with an application service like SQL Server, the provisioning process injects the new database connection details into the web.config file of the web application. We can prove this by first finding our application in the Cloud Foundry Explorer. [caption id="attachment_85" align="aligncenter" width="320"]
 Databases Listed in Cloud Foundry Explorer[/caption] When I double-clicked the web.config file, I could see that a series of “app settings” were added, and, the “Default” connection string was overwritten with the details of the cloud database. Note that the connection strong had to be named “Default” for this to work! [caption id="attachment_86" align="aligncenter" width="450"]
 Configuration[/caption] Sure enough, when we visit the application deployed to Tier 3’s Web Fabric, we can see that it correctly connects to the database and retrieves a set of records. [caption id="attachment_87" align="aligncenter" width="450"]
 Viewing the Site[/caption] This is just one way that we’ve tried to make it easier to build your applications locally and confidently deploy them to an Iron Foundry cloud without requiring error-prone connection string synchronization tasks!
Caldecott with MS SQL Server!
Yesterday we launched our new testing environment that you can read about. With that announcement we added support for Caldecott which allows you to tunnel from your environment to services in the Cloud Foundry environment. Today we have enabled MS SQL support with Caldecott into our .ME environment and also our own version of the Cloud Foundry VMC that has all of the Iron Foundry support built in. Install VMC Iron Foundry Install Ruby for Windows from Ruby Installer. This is tested using version 1.9.3. During installation you can either add ruby to your PATH or add it manually later. Run the following commands from a command prompt. You should ensure that ruby and sqlcmd are in your PATH as well. Checking ruby version:
C:\>ruby --version
ruby 1.9.3p125 (2012-02-16) [i386-mingw32]
C:\>gem install vmc-ironfoundry --preCaldecott and MS SQL To use Caldecott on Iron Foundry from a Windows machine to connect to a provisioned MS SQL database, follow these steps. Install Ruby for Windows from Ruby Installer. This is tested using version 1.9.3. During installation you can either add ruby to your PATH or add it manually later. Run the following commands from a command prompt. You should ensure that ruby and sqlcmd are in your PATH as well. Checking ruby version:
C:\>ruby --version
ruby 1.9.3p125 (2012-02-16) [i386-mingw32]
Ensuring that sqlcmd.exe is in your PATH. If not, it is located by default at C:\Program Files\Microsoft SQL Server\100\Tools\Binn\sqlcmd.exe
C:\>sqlcmd /?
Microsoft (R) SQL Server Command Line Tool
Version 10.50.2500.0 NT x64
Copyright (c) Microsoft Corporation. All rights reserved.
Install the vmc-IronFoundry gem
C:\>gem install vmc-IronFoundry --pre
Fetching: vmc-IronFoundry-0.3.16.IF.1.gem (100%)
Successfully installed vmc-IronFoundry-0.3.16.IF.1
1 gem installed
Installing ri documentation for vmc-IronFoundry-0.3.16.IF.1...
Installing RDoc documentation for vmc-IronFoundry-0.3.16.IF.1...
Target api.ironfoundry.me and log in to your account
C:\>vmc target api.ironfoundry.me
Successfully targeted to [http://api.ironfoundry.me]
C:\>vmc login --email  --passwd XXXYYYZZZ
Attempting login to [http://api.ironfoundry.me]
Successfully logged into [http://api.ironfoundry.me]
Provision an MS SQL database
C:\>vmc create-service mssql
Creating Service [mssql-c902d]: OK
Tunnel to your database
C:\>vmc tunnel mssql-c902d sqlcmd
Deploying tunnel application 'caldecott'.
Uploading Application:
 Checking for available resources: OK
 Packing application: OK
 Uploading (1K): OK
Push Status: OK
Binding Service [mssql-c902d]: OK
Staging Application 'caldecott': OK
Starting Application 'caldecott': OK
Getting tunnel connection info: OK
Service connection info:
 username : uxeBbNM0jYAFS
 password : psOmxGWibimeX
 name : d7dedaf7e01ae42568c07c44ec30bff99
Starting tunnel to mssql-c902d on port 10000.
Launching 'sqlcmd -S localhost,10000 -U uxeBbNM0jYAFS -P psOmxGWibimeX -d d7dedaf7e01ae42568c07c44ec30bff99'
1>
You can now run commands from within sqlcmd against your database!
1> select @@VERSION 2> GO Microsoft SQL Server 2008 R2 (SP1) - 10.50.2500.0 (X64) Jun 17 2011 00:54:03 Copyright (c) Microsoft Corporation Enterprise Edition (64-bit) on Windows NT 6.1In addition, you can use the displayed connection information to connect via SQL Management Studio. Just use localhost,10000 as the "Server name". Be sure to start the tunnel first and keep it open during the time you're using Management Studio. Quitting sqlcmd will close the tunnel.(Build 7601: Service Pack 1) (Hypervisor)
 Read More
How To Deploy Orchard CMS on Iron Foundry
Iron Foundry is an open source project that extends .NET to Cloud Foundry (The Open Platform as a Service). available for the Windows Server Environments with the ability to run the full spectrum of .NET Web Applications, SQL Server, and more. Iron Foundry places the Microsoft tool stack on an even footing with the Linux-based stacks. This platform is all open source and can be deployed anywhere. Today we are going to use the free trial environment provided by the Iron Foundry project.
With Iron Foundry and Cloud Foundry Orchard can scale within minutes to handle load on the system. This also gives an environment for rapid testing and staging of your application.
In four easy steps you can deploy and start configuring your Orchard CMS instance on Iron Foundry:
Step 1: Download Orchard CMS
To download Orchard just go to the Download Page and then select the “Download as a zip” it is about 8MB in size. It will then ask you to agree to the terms.
Step 2: Make changes to be supported on Iron Foundry
- Go ahead and unzip it to your temporary directory.
You can read more about the manual install here:http://docs.orchardproject.net/Documentation/Manually-installing-Orchard-zip-file
Step 3: Sign up and Deploy to Iron Foundry
- Sign up for your free account on Iron Foundry so you can test your deployment. (Note: this can take up to 24 hours to get your account activated.)
- Once your account is activated you can also download the Cloud Foundry Explorer from Iron Foundry.
- After installing the Cloud Foundry explorer you will need to run the application.
-
Upon startup, use the gear icon to add a connection to api.gofoundry.net:

- You will be presented with the “Manage Clouds” screen (new in 1.6.0). To add a well-known cloud, use the dropdown at the bottom of the left side of the screen, with the cloud-plus icon. Select “Iron Foundry” to add a connection to this cloud. The url will be pre-filled to http://api.gofoundry.net
-
Enter the email address and password credentials that were mailed to you upon signup. Use the “Validate Account” button to double-check your entries

-
When you choose “Ok”, you will see this new cloud connection added to your explorer window.

- Double-click the new connection to see an overview that will be displayed on the right.

- Next you will want to create an SQL instance to use. Main Iron Foundry Production tab at the bottom switch to “Applications” view.
- On the services click the button to create a new service. Create a name for it and then from the drop down select MS SQL.

-
Use the “Push Application” button to push a new application to Iron Foundry:

- In the dialog, choose the cloud to which to push. Then, choose an application name that does not contain spaces. The url to specify will be in the form APPNAME.gofoundry.net, where APPNAME is the name you chose. Choose Browse… to pick the directory in which you unziped your orchard application. Note: this directory is the one in which a Web.config file and a bin subdirectory exists.

- Once push completes, browse to APPNAME.gofoundry.net to see your deployed application.
Step 4: Setup your new Orchard Instance
You should be able to browse to your new orchard install at your application url (http://APPNAME.gofoundry.net) where you will see a getting started page: 
When you get to the screen below you are going to want to select to deploy SQL server and put in the connection string. To get the connection string you need to do the following:
- Go back to the Cloud Foundry Explorer
- Once there browse to your cloud and then browse to your application
- Once you have expanded to see the files double click on the web.config file which will open for you. In there you will see more entries added. All you need to do is copy the SQL server configuration settings and then put it into the orchard setup screen.

Cloud Foundry with Iron Foundry (Windows Core) Install

Cloud Foundry has been taking the web by storm. PaaS is growing in popularity as more developers find the disruptively positive deployment scenarios that are possible over traditional environments. Cloud Foundry, primarily centered around Linux-based PaaS, now has a sibling called Iron Foundry.
Iron Foundry is an open source project available for the Windows Server Environments with the ability to run the full spectrum of .NET Web Applications, SQL Server, and more. IronFoundry places the Microsoft tool stack on an even footing with the Linux-based stacks.

Step 1: Get IronFoundry Installed and Running by
The first thing you’ll need is to be sure to get a USB Thumb Drive or some mechanism to get the .NET 4.0 & IronFoundry Software onto the Windows Server 2008 Core Instance. If you’re using a full install of Windows Server 2008 then you can use the normal means to retrieve this software. The files you’ll want on the external storage include:
- .NET 4.0 Framework for Server Core (dotNetFx40_Full_x86_x64_SC.exe)
- IronFoundry DEA Service (IronFoundry.Dea.Service.x86.msi or IronFoundry.Dea.Service.x64.msi)
Once you have the software downloaded to a medium to use, get a solid image of Windows 2008 Server Core up and running. With the Windows 2008 Server Core command prompt get the following services installed and started with the following commands:
c:UsersMyUserNamestart /w ocsetup IIS-WebServerRole
c:UsersMyUserNamestart /w ocsetup WAS-NetFxEnvironment
c:UsersMyUserNamestart /w ocsetup IIS-ISAPIExtensions
c:UsersMyUserNamestart /w ocsetup IIS-ISAPIFilter
c:UsersMyUserNamestart /w ocsetup IIS-NetFxExtensibility
c:UsersMyUserNamestart /w ocsetup IIS-ASPNET
c:UsersMyUserNamestart /w ocsetup MicrosoftWindowsPowerShell
c:UsersMyUserNamestart /w ocsetup ServerCore-WOW64
c:UsersMyUserNamestart /w ocsetup NetFx2-ServerCore
c:UsersMyUserNamestart /w ocsetup NetFx2-ServerCore-WOW64

After these services are started, copy the software off of the USB / Storage Device that has .NET 4.0 and the IronFoundry DEA. In the below copy command, “e:” is the storage device.
e:copy *.* c:UsersMyUserName
Now execute the .NET 4.0 Framework (dotNetFx40_Full_x86_x64_SC.exe) for Windows 2008 Server Core.
c:UsersMyUserNamedotNetFx40_Full_x86_x64_SC.exe
From this point a standard Windows Wizard will display to step through the rest of the .NET 4.0 Server Core Installation. The next step is to enable IIS Remote Administration:
c:UsersMyUserNamereg add HKEY_LOCAL_MACHINESOFTWAREMicrosoftWebManagementServer /v EnableRemoteManagement /t REG_DWORD /d 1
At this point it is actually a good idea to reboot the server to insure all the services start correctly and the registry setting takes effect. I’m sure that just simply restarting the services might work, but when playing with the registry I like to stay safe and insure everything is set and has taken effect.
After the reboot, start wmsvc.
c:UsersMyUserNamenet start wmsvc
Now kick off the IronFoundry DEA Installation. When the wizard prompts for configuration information, enter the following:
- NATS Host: 10.0.0.1
- NATS Port: 4222
- App Directory: C:IronFoundryapps
- Droplet Directory: C:IronFoundrydroplets
- Install Directory: C:Program FilesIron FoundryDEA
Once the wizard is complete, then go to c:Program FilesIron FoundryDEA and run the DEA executable. This will start the IronFoundry DEA Service and insure it kicks off (self starting) anytime the server may be rebooted.
Step 2: Deploy an ASP.NET MVC Application by
Deploying an ASP.NET MVC application could not be easier when using Iron Foundry and the accompanying tools. There are three ways to deploy your application to Iron Foundry:
- Visual Studio: The Iron Foundry plugin for Visual Studio allows you to push your application to any Cloud Foundry environment supporting .NET.
- Cloud Foundry Explorer: The Cloud Foundry Explorer is a .NET Windows application that allows you to manage multiple cloud instances from a Windows desktop including all of the code and service deployment.
- Command Line (VMC): This is the command line version with all of the features that you see from the plugin and explorer.
You can download these from Iron Foundry at: https://ironfoundry.org/download
Getting down to code a deployment…
Lets first start out with downloading and installing the Visual Studio Plugin from Iron Foundry. Go to https://ironfoundry.org/download and download the latest. After it is downloaded double click the file and do the install. After the install is done open up Visual Studio and go to Tools > Extension Manager > From there you should see it installed:

Lets go ahead and write a simple ASP.NET MVC (MVC 3 is being used in this and can be downloaded here: http://www.asp.net/mvc) application by creating a simple “Hello World” application for testing. In Visual Studio do the following:
- Go to File > New Project
- Select the ASP.NET MVC 3 Web Application, set the name, location, and solution name and click “ok”
- On the next screen you will be prompted with the “Project Template” and you can select “Empty” and your view engine as “Razor”.
Now we have setup the project we are going to write a simple page and publish it to an Iron Foundry instance.
- From the Solution Explorer right click on the “Controllers” folder and go to Add > Controller.
- The “Add Controller” dialogue window will come up and name it “HomeController” then click the “Add” button.
- Next step is to add the Index View for the Home controller. You can do this by the following:
- Go to the “Views” folder > Create a folder called “Home” inside it
- Right click on the “Home” folder that was just created and Add > View. Name the View “Index.”

(NOTE: Make sure you have compiled the site at least once before pushing it live for the first time.)
With the Visual Studio Plugin from Iron Foundry it is very easy to do a deployment/update from. All you will need to do is define your Cloud Foundry instance with Iron Foundry support and then “Push” your application.
Define your Cloud Foundry instance with Iron Foundry Support:
-
- From Visual Studio Go to Tools > Cloud Foundry Explorer
-
From Cloud Foundry Explorer click the add new cloud button.
-
Enter in the following data:
- Server Name: The friendly name of the Cloud Foundry instance you plan to connect to. For this example we will use the
-
- Runtime Environment: Select the correct runtime environment (right now it should default to: Cloud Foundry Runtime v1.0).
- Register/Logon Info: The Email, and Password are what you need to logon to your Cloud Foundry instance.
- URL: To setup the url of your cloud foundry instance do the following:
- Click on the “Manage Cloud…” button.
- From the Manage Cloud Urls… window click “Add”
-
From the Add Cloud Url.. window type the Name and URL such as:
- Name: Iron Foundry Trial
- Url: http://api.gofoundry.net
- Click Ok.
-
From the Manage Cloud Urls… window verify that your URL has been added and click ok.

- Once you have entered the information correctly click to validate account and you will see an“Account Valid” message appear.
- Close out the Cloud Foundry Explorer window as you are now ready to push your application!
- Push your Application (The Cool Stuff!)
Now that you have been able to setup your Cloud Foundry instance running Iron Foundry you can now push and update your application by doing the following:
- Right click on your project and then go to “Push Cloud Foundry Application…

- From the Push Cloud Foundry Application select the correct settings:
- Cloud: Select the cloud you entered above.
- Name: Enter in any name you want for the application.
- URL: enter in the full url of the application. Here we will use helloworld23451.gofoundry.net.
- Memory Limit: Select the amount of memory you want your application to use.
- Instances: Select the number of instances you want your application running on.
- Select the services you want to bind to your application such as a database.

Click the “Push” and it will package it up and push it live doing all the configuration of the services and application into Cloud Foundry with Iron Foundry.